Showing posts with label Cake Decorating. Show all posts

Tuesday, January 3, 2012

More Sugar Flowers with PME

I recently managed to take a quick trip back home.  December is a great time to visit as everyone is so excited about Christmas!! 

My primary reason for this trip was to learn more about sugar flowers at PME cake decorating school in Enfield, near London.  It was a very affordable 4 day intensive course, which was only 250 pounds, which included lunch and as much coffee and tea as we could drink.  I didnt realize at the time, but it was part 3 of a 'master sugar artist' course.  I may return for the other parts in the future.


 We covered so many flowers! 

Starting with some unwired flowers we made gerbera with ivy, a rose, and a Christmas rose and poinsettia. They were all on plaques, which could be prepared ahead and then would finish any cake very nicely.


We then started on some more difficult wired flowers.  We made 'filler flowers' and buds, then fuschias.


Carnations were next.  Apparently the instructor doesnt like carnations, but I really loved them.  I'd love to design a cake with some enormous carnation type fantasy flowers dotting the front of it!


We then made some lily of the valley.  This was the instructors work, I thought they were so delicate and pretty, and actually not that hard to do, I hope to be making more of these in the future.  So cute!

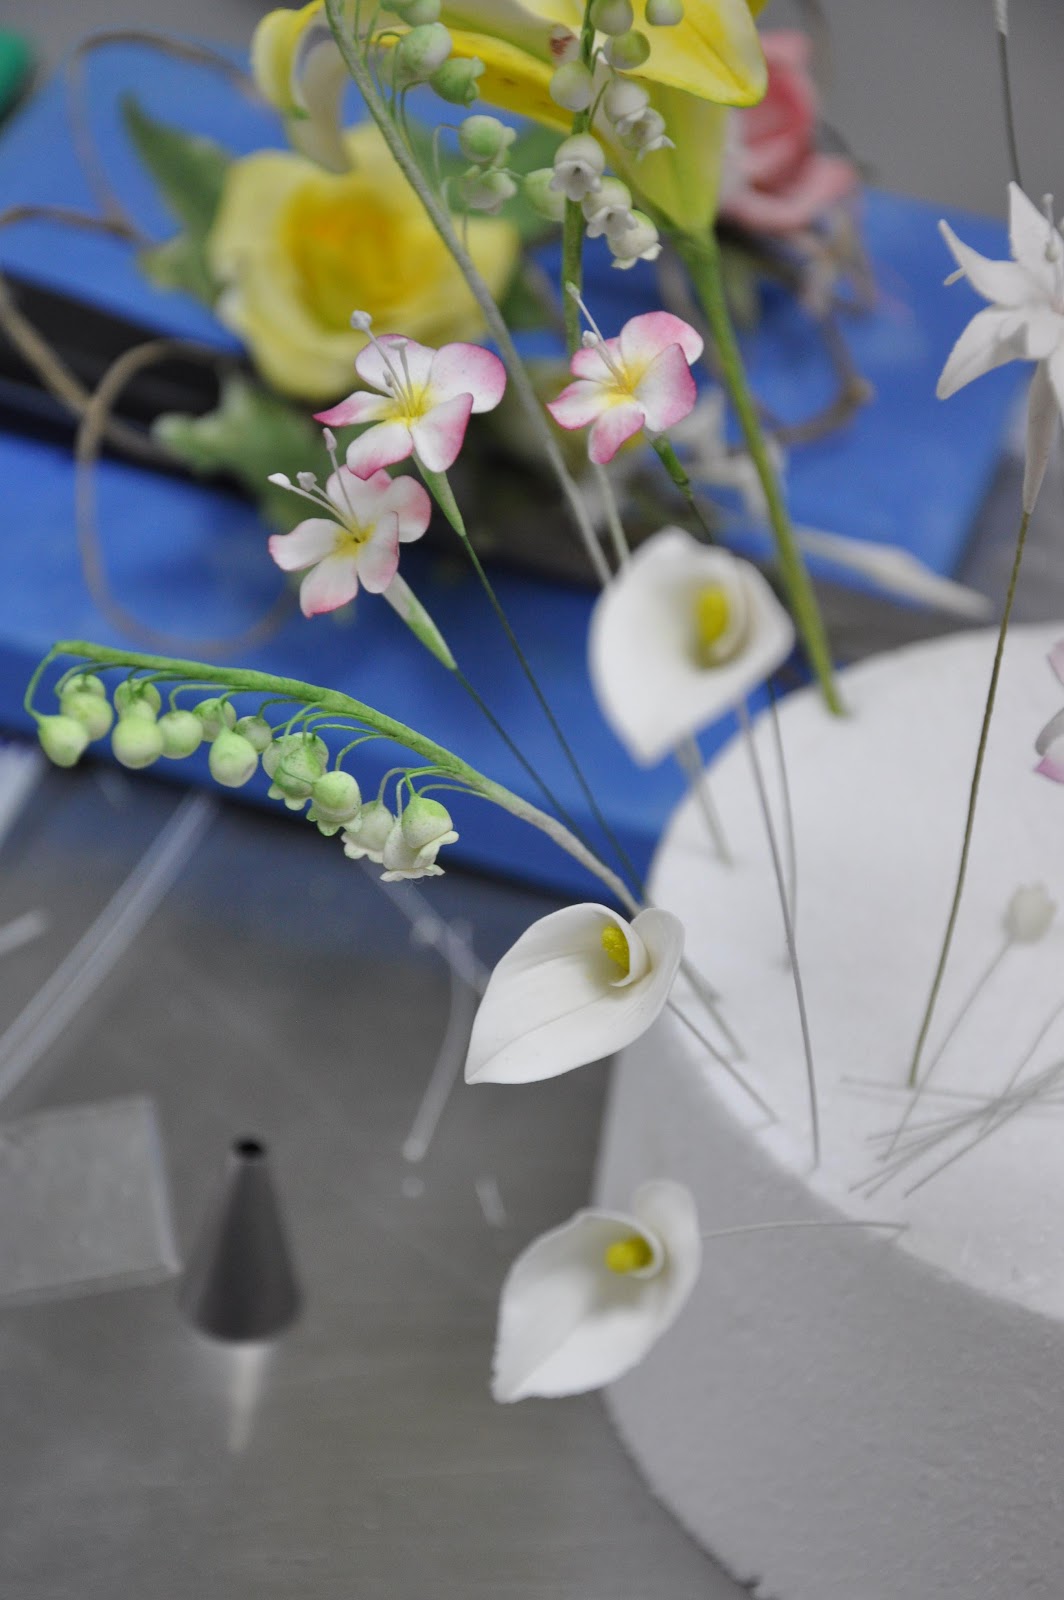
This picture also shows some calla lilies.  They were nice and simple to do too.


We also made rose leaves and ivy.  I was disappointed that this was one of the last things we got started on, leaves are very important in the design of bouquets, so it was very frustrating that there wasn't much time for these because everyone got so caught up with their other projects.  If we'd been taught these early, we could have been working on these in any downtime we had.


This is the display that the instructor made,with a very pretty lily, which was one of the other flowers we worked on.

The other flower we made was, of course, a rose.  This is one of the most used flowers in cake design so it was good to have another try at it.  I didn't quite get mine perfect, but hopefully with a bit more work I can get the hang of them!


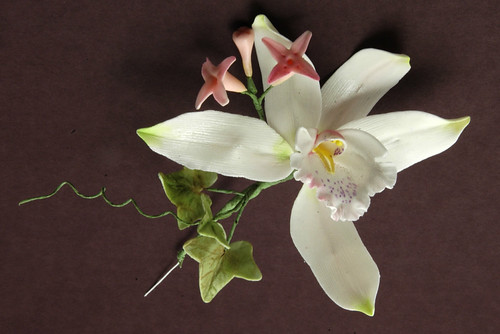
 This is one of my sprays of flowers, you can see I'd have been better off had I had some extra ivy to fill it out, and my coloring of my lily left a little to be desired, but its a good start!


My other spray had the prettier flowers, but 'lacked focus'.  You can see that my next project will need to be a flower arranging class!  It was amazing to see the sheer volume of flowers we managed to produce in 4 days!!
Previous classes I've taken leave you with two flowers over two days, so this was definitely more intense and productive!  PME designed this class to help people produce sugar flowers that were actually commercially viable, so they may not always be perfectly correct looking, but good enough for most people. 

The other downside with the PME classes is that the only equipment and supplies used are ones that PME sell, so they were either JEM, Wilton or PME.  Even if there was a better product, we werent able to use it.  This was particularly frustrating when making leaves as I'm used to using a grooved board to roll them out on, which leaves a groove for the wire to be put into.

I've taken a few pictures of other examples from the other students and instructors.  It was interesting to see the different color schemes. 

Every student on the class went away with something beautiful, so it was a testament to a great instructor that such a complex skill was so well taught. 

Having been to many classes with Jacqueline Butler at Petalsweet Cakes, and also a class with Tami Utley, I'd say this was much more intense, and the students were not there to have fun, they were there to learn.  Everyone seemed to be feeling the pressure, even though maybe half of us werent professionals.  I had to wonder about why they were taking time off work to do something that seemed to be stressing them out so much!

Overall this was a great experience.  I got experience of making a ton of different flowers.  I feel a lot more confident about trying new sugar flowers, and I already was asked to make some orchids for a cake that they were making at CAKE, so they already came in handy!  Here are the bright vibrant flowers they asked for!


Sunday, February 6, 2011

Hula girl!

I'm trying to be better about blogging this year, I'm going to aim to post a lot more cakes on here, since that is something I'm doing lots of. Since most of our dinners consist of some sort of roasted veggies and protein, and the occasional pizza, thats not really much to write home about!
Here's a recent favourite, the theme of the party was Hawaii and hula skirts, so I thought it would be fun to give the cake a little hula skirt. I find the doll cakes with a barbie torso jammed into a round cake deeply disturbing, so I was more going for the theme rather than an actual hula skirt.
I accompanied the cute cake with some cupcakes topped with little hula skirts and flowers to complete the theme.
This is a case where the flower molds come in very handy, I have a delightful little frangipane mould, which I picked up in australia, and another flower which approximates to a hibiscus.
For the writing I used the tappit funky letters, they are super cute and much easier to use than the teeny tappits.

Friday, April 30, 2010

Cakes cakes cakes!

I guess one of the reasons I havent had much of a chance to blog is that I've been so busy making cakes for friends! I've been able to get lots of great experience in, but it doesnt leave much time for anything else!

I thought I'd share some of the fun stuff I've been up to.

This was a fun little set up for a 1 year old birthday. I finally discovered the magic of the glue gun, which was just wonderful for putting pretty ribbon on my cake stand!


A friend's son turned 3 and he requested a 'cat in the hat' cake. I was very happy with this tall hat cake, and modelled 'thing 1' and 'thing 2'. I even had alternating layers of vanilla/red velvet cake inside to match the fondant, which apparently went down very well. The birthday boy stuck to eating the characters!


I had my first try at a flower pot cake, this was really fun to do, I added some cake crumbs for soil.


Another set up I was quite proud of was this spiderman party. I hand modelled spidey and popped him on a fondant spider web. It was accompanied with some cupcakes topped with spidey themed toppers!

There have been lots more but I wouldnt want to bore you, feel free to click on my flickr page for more, and to keep up with how I'm doing with my cakes, you can 'like' me on facebook at www.facebook.com/jennywennycakes

Sunday, January 24, 2010

Cupcake decorating party!

Cupcake decorating parties are something that scared me to bits, but someone asked me to help out at a party, and I thought it would be fun to give it a try and it went very well!


I really enjoyed hanging out with my friends kids who were 'helping' me make decorations for a wedding cake, so I had an idea of what would be fun for them.


What I learned was that they were extremely excited by sprinkles and M&M's and that they did like to roll out fondant and cut shapes. I just have to learn how not to laugh at their mutant cyclops bees. Hmmmm.


It can be an extremely messy affair, I was very happy that it wasn't in my house, it was held in a community area of the complex, the table was covered, and I brought lots of parchment sheets so that I could easily clean up after each child.

Another consideration is to make sure that the parents are happy with what the kiddy is eating, they generally end up with more frosting/sprinkles in their mouth than on the cake. Its maybe a good activity for after the meal (if there is a meal).


They did enjoy making one cupcake for now, and one to take home, so I made sure to stock up on little takeout boxes(super cheap from smart and final).

I bought a pipe from home depot and cut it into small pieces to use for rolling out the fondant. It was useful to have confectioners sugar on hand to stop things sticking!

This day brought me closer to my goal, I'm trying to raise nearly $3,000 for the Leukemia and Lymphoma Society any way I can and the family were kind enough to give me a donation for my troubles! I'm also making cakes and treats for anyone who wants them!

Weight loss update down another pound! Slow but steady! I realised that my evening meals had been getting bigger and bigger and I've been mindful of how much I'm eating and that is helping!


Tuesday, June 16, 2009

Foray into Sugarwork with Orchids

I had the pleasure this weekend of meeting up with one of my cake classmates and going for a sugar class with the immensely talented and busy Tami Utley.


It was a lot more involved than I realised, and I was pretty exhausted by the end, but now that I look at the end product, I'm really happy with it and its great learning a new skill.


These flowers are made on wires, so they are not technically food safe and the wire shouldnt actually touch the cake, so one has to make sure it is placed in a plastic flower holder.


I hope someone wants me to make them a pretty flower cake soon as I'd love to practice my new skills!!


Tami does lots of different classes, at Do it with icing, and also privately, as well as on DVD. I'd love to hear from people as to how they've got on with DVD lessons as its not a medium I've tried.

Wednesday, May 20, 2009

Cake class-final

Today was our last class with Chef Foran at Grossmont College. I was sad because it was an awesome class and I learned so much. My confidence has really grown and I've learned so much. I'm hoping to start some work experience soon so I can use some of my skills and learn much more.

We were given 4 tiers of dummy cakes, I was really keen to try the square cakes, my team were very apprehensive, but I thought we might as well challenge ourselves as much as possible since we're learning.

I think they were very thankful in the end. We decided on a white cake with red accents, which we saw in a book, which I've forgotten the title of! Jessica made some awesome gumpaste roses, I'd love to learn them, they were spectacular! We all had a go at piping the designs, which we traced on with a pin and then piped over the dots. We also used gumpaste cutouts and some pearls.


Here are most of the cakes all together, amazing how all of the groups came up with such different designs! All very pretty though.

My favourite cake (apart from ours!!) was this one with the beautiful purple flowers and painted vines. This was a really pretty technique and I noticed it seemed relatively quick too, which is always a bonus!

This is the other cake which didnt fit on the main table. An amazingly cheery yellow cake with pretty piping and lots of great flowers. I thought it was a really interesting design too. It would be a bit scary to do with real cake!

This was another fun design which looked like maybe a baby shower cake. They chose to put the top tier on its side, which I thought was in interesting look.

Please see http://www.grossmont.edu/ for more details about culinary classes at grossmont college.

Saturday, April 4, 2009

Raspberry Mousse Charlotte

Another Grossmont cake! We made a delicious raspberry mousse cake, 2 layers of sponge with layers of raspberry mousse, surrounded by ladies fingers and topped with a pretty mirror layer, meringue and raspberries.

I learned a clever technique to pipe the lady fingers out to make things a lot easier. This is a really nice cake to serve for a special birthday, I'm annoyed I didnt get a shot of a slice, its very pretty indeed, not to mention delicious!


Raspberry Mousse Charlotte


Makes 2 cakes

Sponge Cake

makes 1 9" cake

4 1/2 oz cake flour
3 1/4 oz sugar
1 1/2 tsp baking powder
1/4 tsp salt

3 egg yolks
2 oz oil
1 tsp vanilla
1/3 cup water

4 egg whites
1/4 tsp cream of tartar
2 oz sugar


Sift together the dry ingredients, whisk together the eggs, oil, vanilla and water then whip the egg whites and cream of tartar, adding the sugar together and beating until the mixture has soft peaks.


Fold the egg yolks into the egg white mixture followed by the flour.

Bake for around 30 mins at 325 in a conventional oven. Allow to cool while the other components are made.

Ladies Fingers

400f convection oven 3-5 mins

2 2/3 oz AP flour
2 oz corn starch

4 egg yolks
pinch of salt
2 oz sugar

4 egg whites
2 1/2 oz sugar
3 drops lemon juice

Sift the flour and corn starch twice. Whisk the egg yolks with the sugar for about 5 minutes until they reach full volume. Whip up the egg whites with the lemon juice, adding the sugar slowly and allowing to form medium peaks. Fold the egg whites into the egg yolks, followed by the dry ingredients

Prepare a baking sheet with a guide so that you can pipe the batter to surround a cake, for us, our circles were about 2 inches high, so we piped our ladies fingers to be slightly wider. As you can see, this is a quick technique for forming the surround for a cake without having to make individual fingers.

Bake at 400f in a convection oven for 3-5 mins, rotating when half done. Remove from oven and take the parchment out of the baking sheet to prevent over cooking.

Raspberry Mousse

18 oz seedless raspberry puree
8 oz sugar
pinch salt
2 tablespoons lemon juice

6 sheets gelatin=bloomed in cold water

24 oz whipping cream

Warm the puree, sugar and lemon juice in a saucepan until sugar is completely dissolved. Squeeze out the gelatin and whisk into the puree mixture. Allow to cool.

Whip the cream until medium peaks form, then fold the raspberry mixture in.

Raspberry Glaze prepare when cake is ready to serve

6 oz seedless raspberry puree
4 oz water
3 1/2 oz sugar
1 tablespoon pectin

2 sheets gelatin-bloomed

Combine the puree, water and sugar and bring to a boil. Sprinkle pectin in, boil gently for a minute, then strain through a chinois. Strain gelatin and whisk in.


Italian meringue

1 parts egg whites
2 parts sugar

whisk over boiling water until temp reaches 240f then whip at high speed until firm.

Soaking syrup
4 oz simple syrup
1 oz Chambord

Assembly


Cut the ladies fingers to fit into a 9" cake ring, fit in nice and snug.


Cut the cake into 4 layers and trim until it fits snug inside the ladies finger ring. Brush with syrup then ladle a layer of raspberry mousse. Add second cake, brush with more syrup them add more raspberry mousse. Get a nice flat finish, leaving 1/4 inch for the glaze, then freeze the whole cake for at least 4 hours until firm.


Remove cake from freezer, then quickly pour glaze over the top. Allow to cool for 30 mins


Pipe meringue onto cake


Brown meringue wiht a blowtorch, making sure not to burn the sides of the cake


Decorate with raspberries, make sure the cake has fully defrosted before serving.

Thursday, March 19, 2009

Busybee

I've really been slacking off in terms of keeping up with this blog, I love sharing my recipes and thoughts. Hopefully after this weekend I'll have more time. I've been so busy making cakes for people I haven't had time to share any recipes, so I thought I'd share some here, and feel free to check out my flickr page to see more.

I made some thomas the train cakes this weekend for a lovely little boy. I think they went down quite well from the party photos. Thanks to flickr user hello naomi for the inspiration


I also had a couple of requests for polka dot cakes for people, they were very specific about the colors. My fondant technique is getting much better and I dont have to worry about hiding stuff quite as much these days!!


Another fun project was some tiffany boxes. I took a starburst chew, encased it in a thin layer of chocolate and topped with a bow. These adorned the super delicious raspberry chocolate cupcakes. A bit fiddly as they are very fragile, but super delicious

I used a similar technique for these baby blocks, I also got to use my new extruder to make the piping. Its going to be a very handy tool!

A real version of the present cake I made recently:


And my entry for the san diego cake club competition. I was really happy with this, but it obviously didnt wow the judges. Oh well, more practice!


And some carrot cupcakes for the delightful twins celebrating their first birthday. From the pictures it looks like they finished the whole cakes!

Thursday, February 26, 2009

Class 2 at Grossmont-carrot cupcakes

This week was nice and simple, I've made tons of carrot cupcakes recently, so it didnt seem that amazing, but it was interesting to see chef's take on the carrot cake, his recipe was really heavy on the carrots, and used currants, since it was cupcakes he figured he'd go small on everything. Most of the fat was replaced with yoghurt and it wasnt missed. Sometimes this makes a muffiney cake, but in this case it was really nice and very healthy, until we added the frosting!!


I'm all in a quandry about whether this is my favourite, or I like the delia smith recipe. Aagh!


The cream cheese frosting was also really interesting, it had a little white chocolate in it, which apparently stabilizes the frosting a little more. I prefer using less butter and sugar, although it does give a slightly runnier frosting.

Our group learned a very important lesson about the mixer too, our blade was too low and was rubbing against the bowl making the frosting grey, so we had to throw the whole batch out and start again. All it needed was a little adjustment.


We were also taught to mix our raisins and carrots with the flour to get an even distribution in the cake. This is particularly important when you just have, say a few nuts in a cake.


The cakes were piped with a little swirl of the delicious frosting.


Marzipan was dyed orange to make a carrot


More was dyed green and leaves were made


My carrots


Some finished cakes.


Carrot Cupcakes -James Foran


makes 1 dozen


350f conventional oven, 25 minute
Dry
9oz carrots, grated
9oz all purpose flour
3/4 tsp baking powder
3/4 tsp baking soda
1/4 tsp allspice
1/2 tsp cinnamon
1/4 tsp fresh grated nutmeg
2 oz currants
1 1/2 tsp fresh grated ginger

Wet
1/2 tsp kosher salt
7 1/2 oz sugar
1 1/2 oz brown sugar
2 eggs
4 oz brown sugar
4 oz oil
Preheat oven to 350f
Sift the flour, baking soda and baking powder together and mix with the other dry ingredients. Whisk the wet ingredients together for a couple minutes then combine, keeping stirring to a minimum. Scoop into 12 cupcakes and bake at 350f for around 25 mins
Cool for 5 mins in the pan, then on a rack.

White chocolate cream cheese frosting
8oz cream cheese
1oz butter
3/4 tsp lemon juice
1/2 tsp vanilla
3 1/2 oz powdered sugar
2 oz white chocolate, melted
Beat together the cream cheese and butter until smooth, add the lemon juice and vanilla and beat, then add the sugar, slowly mixing until combined, then beat for another minute. Add the white chocolate to combine then pipe onto the cooled cupcakes. Add a little marzipan carrot if you like!

Stay tuned for a monster post next week, we're doing mousse cakes, a 2 week process!