Sunday, December 19, 2010

Just call us volunteers

I'm back from oz, here's just a taster of my fun week, here's my niece in front of the 'kissin tree' as she calls it, you can tell she just melts everyone's heart who meets her, it was so wonderful to spend some time with the family.
What I'm really here for is to talk about Just call us volunteers.
I volunteered for them at Thanksgiving and had lots of fun ripping up turkey legs and making mashed potatoes. I found it really heartwarming that these chefs were carefully preparing a dinner for the homeless in San Diego and working hard to make sure it was a great dinner and using their usual care to prepare great food.

I'll be volunteering again on Christmas Day, and I'll be taking them a check. I dont send any christmas cards any more, I look for a good charity and this charity is one of my favourites.

If you're interested in volunteering or donating then please contact Julie or give me a shout. They are hoping for: 'Warm socks and warm gloves. We are hoping for 600 pairs of each. We also need 40 turkeys, 24 hams and 30 Costco size pumpkin and pecan pies.'


Apologies for the hastily put together post, things are full on crazy in the jennywenny household, I'm trying to unpack my case, make lots of goodies for christmas prezzies, help my hubbie remodel the bathroom, and get the house shipshape for my mother in law's arrival on Tuesday, amongst other things!!

Monday, November 29, 2010

Petalsweet peonies!

As an early birthday/christmas present to myself I booked myself some more lessons with Jaqueline at Petalsweet Cakes. We tackled the peony, and since it was over two days, we were able to try the open and closed peonies.
The open peony is constructed around a set of stamens and the closed is built around a polystyrene ball.

The first task was constructing the petals, you can see how many were needed for this flower, so I got lots of practice in wiring petals. The most important thing to remember is to pinch the petal at the wire to make sure it is fixed. The petals are then laid in an apple tray to dry, and as you can see, there is a right and wrong way!


I also took a picture of the stamens, which were attached to a wire with florists tape in 3 bunches.

For the open peony we used a peach colored sugarpaste, then we used petaldust to color them. I was a little timid at the beginning, it is a bit of a skill to get the color on just so. I may experiment with
airbrushing, but for the moment, these powdered colors looked wonderful, especially once they have been steamed.


For the closed peony we got started on the middle of the flower first, I chose to fold 3 petals together in the center, but jacqueline usually uses 2 and 2, so it looked quite different in the center! We allowed the center to dry overnight, then added layer upon layer of wired petals. It ended up being a huge flower, you'd only need one for a cake, so whilst it is a little time consuming it is all the decoration a cake needs!

I took another picture of the flower from the side, I cant wait for an opportunity to add these to a cake, although they will have to wait a couple of weeks, I have a date to keep with my family in Melbourne, Australia!

Jacqueline is a fantastic teacher based in San Diego, she does private lessons, or if you would like to take a group class with her, bug your local cake decorating shop to ask her to teach there!


Saturday, October 30, 2010

Foray into morocco!


We've been regulars at Kous Kous Moroccan Bistro for a few years now, we love the delicious slow braised meats, and I love the tender shrimp brioche and the tasty harissa soup.
I've been on at Moumen for ages to try and expand his dessert menu, and it ended up culminating in me offering to help out with a chocolate dessert.

So here is my flourless ginger chocolate cake with a white chocolate cardamom sauce to accompany it.
Feel free to stop by and give it a try!
Kous Kous Moroccan Bistro
3940 4th Ave #110
San Diego

Monday, October 18, 2010

Gingerbread Pumpkin Muffins

I wanted to share this recipe despite my crummy picture on a gloomy day. These muffins were extremely satisfying yet very healthy. The lack of butter was made up for by pumpkin, lots of spices, molasses and dried fruit. I added in some pecans for a nutty crunch, and subbed some wholemeal flour for a healthier profile.

As you may see, there is an unusual off white countertop, yes, I've finally moved into the new house, and the kitchen is truly wonderful. It deserves its own post soon, once I have it shipshape, suffice to say, I'm delighted!

These muffins perfectly fit the fall drizzle and gloomy weather we've been having lately, and the ginger will give a kick to remind you of the tropics. You could even serve with a cider and caramel sauce or a bit of custard to serve as dessert. If you cant be bothered with measuring all those spices, 3 tsp of pumpkin pie spice could be substituted for most of them, add pepper and ginger though!

Ginger Pumpkin Muffins (recipe adapted from Cooking Light Magazine).
Makes 18 muffins
1/3 cup raisins
1/4 cup chopped pitted dates
3 tbsps chopped candied ginger (adjust to taste)
2 tablespoons (or a litle more!) dark rum

1 tsp vanilla extract
2 large egg whites
1 large egg
2/3 cup packed brown sugar
1/3 cup molasses
1 1/3 cup all purpose flour
2/3 cup whole wheat pastry flour
1 1/2 tsp ground ginger
1 tsp baking soda
3/4 tsp ground allspice
1/2 tsp salt
1/2 tsp ground nutmeg
1/4 tsp ground cinnamon
1/4 tsp ground cloves
1/8 tsp ground pepper

1 cup canned pumpkin
2/3 cup low fat buttermilk
4 tablespoons/2 oz butter, melted
1/2 cup chopped pecans

Preheat oven to 350f or 325 convection

Combine the dried fruit and rum and soak for at least 30 minutes

Whisk together the eggs, sugar and molasses, keep whisking for a few minutes. Meanwhile, sieve together the flour, baking soda, salt and spices. Combine the pumpkin, buttermilk and melted butter. Add the flour and the buttermilk mixture in portions, alternating between the two, mix just until combined. Stir in the pecans and the soak fruit. Scoop into cupcake cases and bake for around 18-22 minutes(5 mins less for convection). Check with a toothpick after 15 minutes and if it comes out clean they are done!

Serve warm with caramel sauce or custard as dessert or eat for breakfast with a cup of tea!

Saturday, October 16, 2010

Brummie Wedding Cake!

What a crazy and fun experience it was making and decorating a cake for my friend in my home country! It was a considerable risk, since I dont know the ingredients, wasnt exactly sure of the location that I would be working in, and I had serious doubts about my ability to pull it off.


Thankfully it all turned out well, my lovely patient long suffering Mum was my sous chef, she also found me a huge and wonderful kitchen, with tons of space, great ovens, a giant
mixer, and a very helpful manager who found us whatever we
needed!
We were actually working in the Masonic Lodge's kitchen. I dont know much about what goes on but I do know that they love their meat! The chef was preparing masses of devilled kidneys for a function the following day, and they also made some heavenly smelling steak and kidney pies. I guess that funny handshaking needs a lot of protein for fortification!

Mum was completely amazed by the amount of ingredients we needed as I swept a whole shelf of chocolate from the display at Asda. I normally use callebut chocolate but didnt come across any, so I used a combination of cadbury and green and blacks chocolate with a little galaxy mixed in there.

We got to work on the first day, baked all the cakes in sheets, wrapped them up and then prepared the ganaches. I made a mixture of white and milk chocolate ganaches. These were an excellent complement to a dark mud cake(the bottom tier) and a solid chocolate cake(the top two cakes). We also had to make gallons of chocolate ganache to use as a covering. I'd decided this was going to be the most elegant presentation, and I didnt want to work with new fondant, or worry about buttercream melting.

The next day we came back and cut the cakes to size, then stacked four layers of cake filled with three layers of filling. I carefully measured the cake to ensure it was completely straight, then cut to eliminate any high spots. This is extremely important to produce a neat uniform cake, with a square there are more angles to compare, so just a little bit of a wrong angle looks terrible.

I then crumb coated each cake with a layer of ganache. It was so cold that day that I needed to work very quickly, the ganache started setting almost as soon as I started working! I followed that with another two layers to try and get a smooth finish. This was the trickiest part. I used a bench scraper to get a nice clean line, not as clean as I'd have liked, since the ganache kept setting so quickly, but I had to remember the famous quote 'dont let the perfect be the enemy of the good' which is turning into my mantra.
I stacked all the cakes with plenty of support, then added a fondant ribbon. We heaved a heavy sigh of relief once the behemoth was in the fridge, and went home for a much needed rest!
There were plenty of offcuts of cake left, so I took some home with the chocolate ganache around to my friend's house for dessert and I could tell we'd made a good cake when complete silcence descended upon us until we'd cleared our plates!

The wedding was at the beautiful Highbury Hall, somewhere I'd probably been past a million times but never set foot in! We set the cake up on a dramatic pewter stand and it started to really take shape.


I added the characters and some flowers and it looked great, if a little odd! I'd made all the requested characters, robot, monkey, dinosaur, giraffe, cat and some ninjas, and I decided it would be fun to have two of them as the couple, so added a bow tie to the robot and a little veil to the giraffe.

I also took the other side of the cake as a different perspective and added some sugar flowers that I'd copied from some very blurry pictures of the brides dress.


Everyone was extremely excited by the cake, and it was really fun being able to be a part of my dear friend's day. I did have a little worry, the cake was placed in front of a giant radiator, and I think the insides were a little melty by the time it was served. Thankfully the ganache stood up well to the heat, I dont think buttercream would have survived.


I took the remainder of the ganache and diluted it with cream to make a delicious pouring sauce.


As always with these kind of events, I'll raise a glass (or a cup of tea) to the happy couple, Em and Daz. They were just glowing that day, and I'm so glad that they've found each other, they complement each other perfectly.


The speeches were wonderful, there was so much love in the room for them and support for their union it was really touching. As they return from their honeymoon, I hope they will look back on their day with as much happiness as I do.


Monday, September 27, 2010

Daring bakers make sugar cookies!

The September 2010 Daring Bakers’ challenge was hosted by Mandy of “What the Fruitcake?!” Mandy challenged everyone to make Decorated Sugar Cookies based on recipes from Peggy Porschen and The Joy of Baking.

I was so happy that the bloggers this month chose a challenge that I was planning to do that week anyway! I had a try of the recipe, made loads of cookies and then tried some new icing techniques, as well as decorating some with little fondant mickeys for a birthday party.


I found the recipe was great, although when I tasted a cookie it was on the dry side. I guess you en
d up sacrificing a little of the buttery goodness for a cookie that is super easy to roll out, and that doesnt spread when baking, so I made sure to use lots of icing with a kick of lime juice to increase the flavor.

I tried some different techniques here. Firstly, I tried piping a border around the cookies to make sure the outside of the icing was neat, then I filled in with white icing and used dots or swirls of red icing to create various effects. This was easier than I expected!

With another batch, I added a dollop of the sugar icing, then a cute fondant mickey, with a letter 'c' for the birthday boy!

Make sure to check out the other daring bakers, I'm sure there will be some wonderful designs!!

Friday, September 17, 2010

Slow blogging times

I've been terribly slow with the blogging lately, life has really got in the way. I've had some great foodie things going on with fun cakes, the ICES conference, and a house remodel. Thats all got in the way! I thought I'd share some of my cakes that I've been making, its been a fun time and I think I've made some progress.

My dear friend is getting married in a couple of weeks, and I've been working hard on my cake skills to make sure I can make her a great cake. Since its going to be square, I've been practicing square cakes. I had a fun time creating this little display with a yo gabba gabba theme.


This 'little mermaid' themed cake was a lot of fun. I dont like doing human characters so I cheated with a cute little birthday candle from Toys R Us and then added lots of my own touches. It was a lot of fun getting the disco dust and shimmering powders out for lots of girly glitter!

I also had a request from a friend to make a 'mighty boosh' cake for her husband. His favourite episode involved a pac-man game, so I thought it would be fun to add that as a border.


It was also really fun to make a wedding cake, always a happy occasion, the bride was super sweet and wanted something really simple. I loved how this came out.
My most recent cake was quite a project! My friend stealthily had to 'borrow' her sons favourite toy for me to take pictures and measurements of, then I set about making this big garbage truck out of cake. I knew it was a success as soon as I got to the party, everyone was very excited with it, especially the birthday boy, I saw a picture on facebook him standing next to the cake with the biggest grin I've ever seen!
I'm really enjoying making these cakes, I'm hoping to start a small side project selling them soon, once I've got a kitchen space organised. If you're interested in my cakes then feel free to follow me on facebook at www.facebook.com/jennywennycakes to hear more, or email me at jennywennycakes at gmail dot com.
That will all have to wait though, I'm jetting off to the UK for a week and I'll have lots of stories about chip butties, curry, and hopefully an incredible wedding cake for my friend!

Wednesday, August 18, 2010

Foray into 3D cakes with Lauren Kitchens

Today was one of the most fun days I've had in a while. I managed to get a day off work and sneak out to take Lauren Kitchens' class on making a 3D muppet. The class was held at 'Do it with Icing' in Clairemont, San Diego.

Lauren and Ashley were just the most lovely people, and I'm starting to think that the more people I meet who do great cakes, the more I love the cake community.

She gave us all the basic setup, the supports which would be holding up our cakes, which consisted of a masonite board with some sprinkler parts screwed into it, copper piping and a dowel to hold up the head.

We then set apart carving the little body, which turned out to be the only cake. This was covered in white chocolate to make it smooth.

A head was fashioned out of rice krispy treats, which was covered in modelling chocolate (a mixture of seized chocolate and corn syrup). This is great to work with as you can just keep smoothing it. It is a little difficult to work with when warm.

We carved a mouth out of the head, then put it in the fridge as we finished our bodies and arms, and covered the legs with modelling chocolate.

People did some lovely details here, frilly dresses, labcoats with pens in the pockets!

We then stuck the heads on the bodies and went to work on the faces. This is when things started getting fun, the characters really came to life! The most amazing character was this Gene Symonds, what a hoot! He still retained his muppet features, but was so original!

Everyones characters came out absolutely fantastic, they were all super pleased with them and Lauren and Ashley were very clever at coming around and tweaking our characters, and jumping in whenever we had a problem. I'd highly recommend this class to anyone.

We're also hoping that Linda gets lots more of these types of classes at 'Do it with Icing', definitely call and lobby if there is anyone you're interested in learning from. I'm hoping that James Roselle will be next!

I based my character on my husband, I think he was pretty happy with the results!


Saturday, July 31, 2010

Gluten free baking!

A friend of mine was hosting a shower for her sister and her gluten free connection fell through, so she asked me if I might be able to help out. I was eager to help out and learn more about gluten free baking, although it was a little nervewracking as you have to be extremely careful with cross contamination and surprise gluten sneaking in from unexpected places.

This challenge really gave me a window into the world of someone with a food allergy/intolerance, it is so difficult to make sure that nothing contaminates your food. I can imagine on first diagnosis, one might just lose interest in food as it is just so hard to find something to eat.


To combat this I made sure to clean all my equipment, and I checked all my ingredients. I also opted not to use my mixers, since both could be contaminated with flour, it could puff out while I'm mixing. Bob's red mill is a supplier that can be trusted, so I got my almond meal and the baking mix from them, and I also opened a fresh packet of sugar and new baking powder, cocoa and salt, just to be sure I hadnt contaminated any of them with flour. I also checked the labels to ensure that they hadnt been produced in a facility with wheat, or contained wheat. I was disappointed not to be using my favorite callebut chocolate.


I knew one of the cupcakes that would go really well was the kumquat almond cupcake that I've made a few times now, and I just needed another option.

I came across this lovely sounding recipe from gluten free girl and decided to use that. I had some wonderful sour cherries in a jar, and decided to use those. They worked beautifully, adding a sour component, and keeping the cakes moist.


Something to note with gluten free baking is that the consistency is often very peculiar in comparison to regular baking, and with these cupcakes you'll never get a pretty dome, they will just spill over the top of the cases, so only fill 2/3 full, they will sink a little, but think yourself lucky you have extra room for your frosting! Since it is cherry season, I topped with fresh cherries.

Cherry chocolate gluten free cupcakes (adapted from gluten free girl)

150g bittersweet chocolate or choc chips
300g unsalted butter
260 g sugar
5 large eggs
150 g bob's red mill biscuit/baking mix
20g cornstarch
20g grams cocoa powder
1 1/2 tsp baking powder
1/2 teaspoon kosher salt
200g sour cherries (from a jar, drained)
50g dried sour cherries

Preheat the oven to 350f

Melt together the chocolate and butter in 15 second increments in the microwave. Mix in the sugar.

Meanwhile, whisk together the baking mix, cornstarch, cocoa powder and salt.

Whisk the eggs until frothy, mix together with the chocolate mixture and whisk. Add the dry ingredients, mixing until combined, add the cherries, then scoop into cupcake cakes, making sure not to overfill.

Bake for around 25-30 minutes until a toothpick comes out clean.

Cherry Buttercream
500g sugar
250g egg whites
500g butter
75g sour cherry preserves
5ml lemon oil
5ml vanilla

Whisk together the sugar and egg whites over boiling water until the temperature reaches 160f. Place on a stand mixer and whisk until cool and fluffy. Cut the butter into chunks and add slowly while mixing on medium. When the butter has been incorporated and the frosting is silky smooth, add the preserves, lemon and vanilla, whip for a few minutes until combined.

Sunday, July 25, 2010

Living the dream with a farm to table dinner

I had the enormous honor of working with Julie at Dining details on the desserts for a dinner at Bewise Ranch. I saw the dinner advertised since I get my veggies from them on a weekly basis and I offered to help with the desserts. After some communications we did a tasting and I showed up the day before to start the prep.

I knew that it would take a while to get things done for 150 people, but I just didnt realise quite how long, I spent a long 4 hours working away, trying to find things in the kitchen, making my pastry dough on ice, since it was nearly 100 degrees in the kitchen, and finding that making several quarts of pastry cream is a lot different to a pint or two!


I then returned the next day to make my pies, and assemble the trifles.

The part that really got me was making the peach pies. Each pie had a little fan of chopped peaches arranged elegantly in the tart shell. Since we only had muffin pans, there was a little bit of miniturization required, and I started to rue the suggestion I'd made. Even more galling, they looked extremely 'rustic' at the end of the baking process, and it was a bit disappointing.

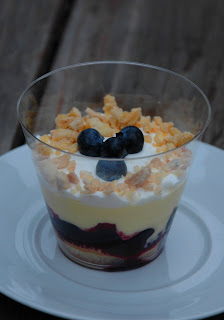
I was much happier with the trifles I made. This dessert made sense on this scale, since it was just a case of cutting circles of cake, drizzling with sherry, adding a little compote, pastry cream, doubling up the layers, piping a little cream, sprinkle of praline and a few blueberries and I was done.

Something that made the job more difficult is that I only had a small corner of the kitchen to work in. If I was to do this again, I'd definitely find a time when the kitchen was nearly empty, and then I can spread out and get things done efficiently, and get out of everyones way.

I learned:

  • Commerical kitchens can be very hot in the summer, this adds to exhaustion!
  • Things always take much longer than you expect

  • Scaling is difficult for large numbers, make more than you possibly expect and calculate carefully

  • Making food for people is hard work

  • Some things need fast hands, and some things(like pastry cream) require patience and slow cooking, there is no way to speed things up, remember how much time you're saving by not having to do it twice!!
  • Carefully think through your preparation and make sure that you can produce consistent results, making 1 or 12 desserts is easy, making 150 exactly the same can be hard, also consider making desserts on a different day, they must always be the same.

  • On the same note, precise recipes are important, and must be tested carefully, consider that scaling them up can change results.
  • It is important to consider efficiency, I should have reworked the peach pies so that I could get them done in less time

  • Most of your work in this industry will be doing calculations, working out how to make money out of it, and washing dishes. You'll be surprised how little time you'll actually end up creating masterpieces! I'm not even going to start on the business side of things!
  • Attending some kind of culinary school, whether its the CIA or your local community college actually is useful, in my opinion. You get a handle on how commercial kitchens work, you learn about proper technique, and its much easier to hit the ground running when you do make your debut in a kitchen.

Anyone have any more tips to share?

I certainly will be going back to my day job with a new outlook! It is a fairly serene atmosphere in a lab, we do have deadlines, but for the most part, everything takes as long as it takes, and we just have to be patient and careful with our work.

I really enjoyed the atmosphere at the kitchen of Dining Details, everyone was extremely helpful and polite and it was wonderful seeing food treated with such respect. The dinner that they conjured up for the people at the farm was absolutely incredible. If I had an event coming up, I wouldnt hesitate to book them right away. Julie also has a company that does childrens meals, Chickpeas, and it was wonderful to see the little packets brimming with delicious veggies and healthy food instead of the insipid sandwiches that I often see given to children these days.

Sunday, July 18, 2010

Sherry Trifle with Lemon, Thyme and Blueberries

This weekend was a big one for me, I worked with dining details to make desserts for many, many people at a farm to table dinner. I thought I'd share the recipe here, and then in my next post I'll share some of my experiences on my first paid pastry job. I know so many people who feel like working in the culinary industry would be a dream come true, so I'll share a little of my 24 hours 'living the dream'! It was a blast, but I wont lie, it was one of the hardest days of my life. There is no such thing as late with catering, you have to be done in time. Very stressful! Anyway, I thought this dessert came out very well. It can be served in little verrines, like at the party, or I've served it in little clear plastic wine cups. Be very careful when adding thyme to the compote, it can be overpowering.

Sherry trifle with lemon, thyme and blueberries developed with Julie at Dining Details
Joconde
3oz almond meal
2 oz powdered sugar
1 1/4 oz cake flour
3 eggs
3egg whites
1/4 tsp salt
1/4 tsp cream of tartar
1 1/4 oz sugar
1 1/4 oz butter melted
Sift together the almond meal, powdered sugar and cake flour
Beat egg whites with cream of tartar, adding sugar slowly until the eggs reach medium peaks.
Whisk the eggs into the flour mixture, fold the egg white mixture in followed by the butter. Be sure to make sure the butter is integrated, but don’t overmix.
Bake on a parchment lined half sheet pan at 350f convection for 5-7 mins until light brown (conventional oven 375 for 10-15 mins)

Lemon Pastry Cream
1 cup (235 mls) whole milk
1 cup (235 mls) heavy cream
4 large egg yolks
2 large eggs
6 tbsp (75 grams) sugar
Zest 2 lemons and juice 1 lemons
Mix the cream, lemon zest, milk and sugar and simmer.
Whisk together the eggs
Slowly pour half of the warm milk mixture into the eggs, whisking vigorously. Pour the egg mixture back into the milk, whisking. Whisk in the lemon juice and simmer until the custard coats the back of a spoon. Pass through a sieve/chinois to remove any lumps and the lemon zest. Cool for 4 hours or overnight.

Blueberry Compote
2 cups blueberries (10 ounces)
1tbsp thyme infused simple syrup
1/4 cup sugar
1 tablespoon fresh lemon juice
2 teaspoons cornstarch
Mix together the sugar and blueberries and heat until gently simmering. Whisk together the lemon juice and the cornstarch and simmer for a couple of minutes until thickened. Cool.

Almond praline
2 cups sugar
1 cup slivered almonds
Salt to taste
Heat the sugar in a small saucepan until melted, watch it carefully in the pan, swirling until it becomes amber. Add the almonds, mix quickly and pour onto a silpat, spreading out as much as possible.
Assembly:

Cut small circles of the jaconde, put into the shot glass, drizzle with sherry, then add a layer of blueberries, a layer of the pastry cream, then top with a little whipped cream, chopped praline and a few fresh blueberries. For the event I repeated the cake, compote and pastry cream (soaking the cake before assembling).

Friday, July 16, 2010

Food 4 Kids


This is a really excellent program. Families who are having trouble coming up with enough food for their kids usually do ok while school is on, most schools provide some sustinence, breakfast and lunch, but in the summertime the kiddies are left high and dry. This program helps with that by giving them backpacks filled with food.

The 2010 “Food 4 Kids” fundraiser has three (3) main components:
• Monetary Fundraiser: A fundraising site has been set up on firstgiving.com/food4kids to allow interested individuals to make monetary donations, add comments and keep track of the fundraiser’s progress. All donors are eligible for prizes donated by local restaurants and businesses which will be awarded by random drawing at the end of the event. Inquiries about the First Giving fundraising page or the prize drawing may be directed to Alice Robertson at aliceqrobertson@gmail.com.
I am very happy to be involved in this part of the program, I will be donating a cake or some cupcakes (or I will make something ship-able if someone is out of town!) to whoever wins my prize!

• Backpack and Food Drive on August 21 at Little Italy Mercato: On August 21, a food and backpack drive will be held at the Little Italy Mercato. Members of the community are asked to bring neutral backpacks (as in no logos and preferably black or red) and kid-friendly non-perishable foods (such as applesauce, cereal, fruit cups, mac ‘n cheese, pretzels, etc., and other healthful foods) to the Little Italy Mercato between 9 AM and 1 PM, where Food 4 Kids volunteers and Food Bank personnel will be on hand to collect them. Inquiries about this event can be directed to either Alice Robertson at aliceqrobertson@gmail.com or Caron Golden at caron@goldenwriting.com.


• Dollar-a-Dish Program: August 1 – August 31: A “Dollar-a-Dish” event is set to run throughout the month of August at participating restaurants. These restaurants will select one of their best selling menu items and will contribute $1 to the Food 4 Kids program for every order of that dish sold during the month of August. At present, 30 restaurants have signed on to participate including: Alchemy, Bencotto, Café Chloe, Cosmopolitan Restaurant, Cowboy Star, Croce’s, Cucina Urbana, Dining Details (Catering,) Gaglione Brothers, George’s at the Cove, Hilton Garden Inn - Del Mar, JRDN, JSix, Kensington Grill, Lotsa Pasta, Nine-Ten, O’Brothers, Pizza Fusion, Playa Grill, Ritual Tavern, Royal India, Sessions Public, Soleluna Café, SoNo Trading Company, Starlite, Stingaree, Terra, The Red Door, Urban Solace and Zenbu. Inquiries about the Dollar-a-Dish event may be directed to Caron Golden at caron@goldenwriting.com.

For more information on the San Diego Food Bank and their Food 4 Kids Program please visit http://www.sandiegofoodbank.org/programs/food4kids/, or to donate visit http://www.firstgiving.com/food4kids

Tuesday, July 13, 2010

The butcher and the vegetarian


As soon as this book came out, I knew I had to read it. I hang on Tara's every word on her blog, Tea and Cookies, so I knew I was in for a treat, word wise, but also it is a topic that is very dear to my heart. The butcher and the vegetarian is a book I recommend everyone reads.

When I refer to my diet, I just say I dont eat meat. I became a vegetarian at the age of 14, after a particularly harrowing project where I wrote an english essay about animal cruelty. I guess the people with the posters got to me. My mum's delicious sunday roast finally sent me over the edge, I just couldnt eat another mouthful. Somehow the huge hunk of meat, which seems so much closer to the animal than a burger or some innocent nuggets made me realize that I just couldnt take any more.

I have slowly re-introduced fish over the last few years and I've always eaten eggs and dairy, but it leaves me with all sorts of moral confusion. I think on principle I would eat the odd piece of grass fed, free range meat, but when it actually comes down to it, I just cant stand the thought of chewing on a hunk of muscle.

Reading this book was incredible, as Tara explained many of the same feelings about meat as I have. Forced by medical worries, she found herself trying to reintroduce meat into her diet, but ended up with a freezer full of meat that was just so much more hassle than a bowl of beans and rice, or noodles and tofu. I know this would be exactly what would happen to me!
This is a really good read, and it explores nicely the dilemmas that I feel everyone should consider when they think about whether they want meat in their diet, and how much they should be eating. I feel strongly that the animals should have the utmost respect and should be treated the best way possible before they become our food.

These idyllic farm pictures from Wales are nothing like the reality of most farm animals lives, I dont think most people like to admit that, but it seems that, especially in the US, price comes before everything, and people are content to eat animals raised on feedlots, eating food that was never meant to be eaten by those animals, the byproducts of these productions becoming toxic waste.
I understand that there are problems, people below the poverty line dont get to stand around in wholefoods debating another dollar per pound of whatever fancy cut they are considering for dinner, but poisoning our land and possibly ourselves cant be the answer can it?

*Pictures from my october trip to the UK including the totally awesome Gene Simmonds sheep!

Saturday, July 3, 2010

Island Style Wedding

This weekend I had the enormous pleasure of making a big showy display of cupcakes with a cutting cake for a guy that I've known for a while. He was our honored team-mate on our bike team, and I've ridden on teams with both his parents, so it was great to be involved in his wedding cake and to see him so healthy and happy.


The couple wanted a hawaiian theme to their wedding and it was more on the tasteful side, so I learned to make frangipane flowers and got some moulds to make little frangipane flowers and hibiscus for each of the cupcakes.


I was so happy with how well this theme came together, it all looked really professional and the flavors were just divine. It sounded like they were all gone with no leftovers so that is a success!! I can never find a general consensus on how many cupcakes should be provided for guests, my intuition tells me around one and a half per guests as some people often take a couple!


There were four flavors, mango macadamia with mango buttercream, chocolate mocha mudcakes with poured chocolate ganache, guava chiffon cakes filled with guava, and topped with guava buttercream and a delicious hummingbird cake packed with pineapple, coconut, pecan and banana, topped with cream cheese. The cutting cake was the mango macadamia flavor.

This cake is a wonderful cake, the original recipe is for strawberry, but I've made it with mixed berries, and it worked very well with mango and macadamia. Keep in mind that this is an extremely rich cake!

Mango Macadamia Butter Cakes adapted from Sky High Irresistable Triple Layer Cakes by Alicia Huntsman and Peter Wynne

Makes around 24 cupcakes

2 1/4 cups cake flour
1 1/2 cups sugar
2 1/2 tsp baking powder
1/2 tsp salt
6 ounces (1 1/2 sticks) soft unsalted butter
1/2 cup mango puree
4 egg whites (100g)
1/3 cup milk
1 diced mango
1 cup chopped toasted macadamias

Preheat the oven to 350f and prepare cupcake pans

Sift the flour into a mixing bowl with the sugar, baking powder and salt and mix briefly. Add the butter and puree and beat for a couple of minutes until fluffy.

Meanwhile, whisk together the milk and the egg whites, adding to the batter in 3 additions. Mix for another 20 seconds until combined, then add the madadamias and diced mango, mix just to combine.

Scoop into cupcake wrappers until 2/3 full and bake for around 20 minutes, or until a toothpick comes out clean.

Top with your choice of topping, I used a standard swiss meringue buttercream with mango puree added, and topped with a fondant flower!

Sunday, June 27, 2010

Daring bakers flying spaghetti monster pavlova!


Wow, I guess my dessert makes a statement. By way of explanation, I plated this super early in the morning, maybe my brain wasnt totally into the game yet!

The June 2010 Daring Bakers’ challenge was hosted by Dawn of Doable and Delicious. Dawn challenged the Daring Bakers’ to make Chocolate Pavlovas and Chocolate Mascarpone Mousse. The challenge recipe is based on a recipe from the book Chocolate Epiphany by Francois Payard

The pavlova consisted of a chocolate meringue, a marscapone pastry cream, and a marscapone ganache.
I absolutely adore pavlova so I was super excited. My first thought when I saw some pictures was that it looked like dog poo, I was a little un-nerved but I thought 'I can do this'! I think if I had added some seasonal fruit, it would have really improved this dish, I ate the leftovers with figs, and it was wonderful!

Time got the better of me, what with all the stuff going on in my life, so I decided that I would make the components, but it was very last minute.

I was pretty disappointed with this dessert. I was disappointed in the recipe, for instance the pastry cream, which was really supposed to be a drizzle, was supposed to be made with 6 egg yolks, which was just ridiculous, and the whole recipe seemed to be about 3 cups of marscapone, which is pretty out there. I reduced the pavlova recipe by 2/3, the pastry cream to 1/3 and the marscapone ganache to 1/2.

The flavor was also a little disappointing. I overcooked the pavlovas, since I made them as tiny little mini meringues, and the marscapone cream was pretty underwhelming.
After this review, I'm not sure that you would want to give it a try, but do go and check out all the other inventive ways this dish was created on www.thedaringkitchen.com

I really appreciate the opportunity to grow and learn with the daring bakers, this was just one challenge that was underwhelming. I look forward to a new challenge next month!!

Friday, June 18, 2010

Born Round

I recently read the memoir of Frank Bruni, reviewer for the New York Times (amongst other things!). I found it a really interesting read, learning about his wonderful family and dear mother.

Over the entire book his weight fluctuates wildly as he desperately attempts to control his urges around food.

The most poignant episodes to me were times when he ended up baling on dates because he was so disgusted with himself and his weight, it seemed so sad that he gave up on companionship and love because he hated himself and his weight so much.

There were tales of bulimia and all kinds of strategies to keep himself trim and scary binges of pizza, cheesesteaks and ice cream.

It was sad to read about his mothers struggle with her weight, and maybe how she taught him to be wary of food as he grew up.
Learning more about the work of restaurant reviewers is a nice reminder that it really isnt that fun a job, eating out at least 7 nights a week, trying to grab enough willing diners who dont mind sharing their meals with you, and dealing with over-anxious restauranteurs who are desperate for a good review.

The main revelation from the book for me came when he lived in Italy, and he realised that the reason these people were a normal size was because of their portion control. They ate small portions of real food. Just like Marian Nestle and Michael Pollan have been trying to tell us!

It really struck a chord with me since I've always had trouble around food, knowing where to stop. I'm lucky, I'm not horribly obese, but I'm always on the chubby side of normal. I think the problems started as a small child, I was a little overweight and I was encouraged to cut back a little. I've never experienced that intense pleasure that Frank Bruni describes when he binges, and for that I'm very grateful.
Maybe I'm lucky, I generally just have a little more to eat than I need, I exercise as much as possible, and I eat lots of fruit and veg, and wholegrains to keep myself full, so I may even be healthier than some of my skinnier counterparts. I have to be relatively strict, I only eat out once or twice a week, I never go to fast food restaurants, and I avoid most processed food.

It also got me wondering, am I more normal than I thought? I always thought I was a bit strange with my continued thinking of what I'll be eating next, maybe looking forward to something for a whole week. Maybe most people think like that, and constantly have to keep check of their eating to keep themselves at a healthy size?

Its just so sad to me that so many people suffer so much with something that is supposed to be one of lifes greatest pleasures. At no time in history more than now have people been so large, we've somehow lost all proportion of how much, and what we are supposed to eat. Are we beyond saving?
I'd love to hear any/all opinions in the comments section!

Tuesday, June 8, 2010

Sugar Gardenias

I recently had the enormous pleasure of taking a one-on-one class with the immensely talented Jaqueline Butler of Petalsweet Cakes.

Of course I had a giant list of things to learn, but she knew what we could fit in and even that was very ambitious. We settled on some sugar gardenias. I love these flowers, so I couldnt wait to recreate them in sugar. I also wanted to make sure that it was a fairly quick flower that I had a chance of being able to replicate in a short enough time to be worth my while, and to be something that isnt easy to get fresh.

Jackie is extremely thorough, patient and well organised. She sets everything out carefully before starting and it was a good lesson to me to make sure I have plenty of room and try to work cleanly and neatly.

Of course they were a lot trickier than they look, but we slowly worked and I finished the class with a full flower, two smaller flowers, 3 lovely glossy leaves, and some buds. I also had a huge shopping list of things to buy!

I learned some very important techniques that I can apply to lots of other stuff, using the colors and lustre dusts, the laquer to get glossy leaves, and making and rolling out gumpaste and shaping petals for a realistic flower.

I'm sure Jackie would be more than happy to hear from anyone who would like to take her lessons, she's based in San Diego, so give her a shout if you'd like to learn from her! She also has a facebook page, its always lovely to see her creations.

Saturday, June 5, 2010

Smores

I found these little treats so delicious I just had to share! It really is worth making the effort to make your own graham crackers, they are totally addictive!

I took a graham cracker recipe from culinary in the desert, next time I'll probably roll them out a little thinner. It really helped to use a pizza cutter and cut them before they went in the oven, and then again before they cooled to make it easy to separate them.

I then topped with a little chocolate ganache, which is just 1 part boiling cream to 1 part good chocolate, combine then stir occasionally until the chocolate is melted and chill a little until the consistency is thick enough to stay on the crackers. 100g of each should be plenty.

I then topped with home made marshmallow from this recipe on the food network and got my torch out to brown the tops, my favourite thing to do in the kitchen!

These treats are going to round out a dessert platter for a wedding I'm involved with at the beginning of next month. There will be a plate for each table containing lemon tarts, choc chip cookies, peanut butter cookies, these and some mini cupcakes!

The next thing I'd like to try with this recipe is making larger cookies, covering with ganache and decorating with fondant, I think that would be a super delicious and cute party favor! Here are some similar sugar cookies I did, I think graham crackers would be delicious!


Thursday, May 27, 2010

Daring Bakers tackle a Croquembouche

The May 2010 Daring Bakers’ challenge was hosted by Cat of Little Miss Cupcake. Cat challenged everyone to make a piece montée, or croquembouche, based on recipes from Peter Kump’s Baking School in Manhattan and Nick Malgieri.

For the recipes, head on over to the daring kitchen and give it a try!


I really enjoyed this daring bakers challenge. I was so happy that it was something I could accomplish in just under a couple of hours too! I baked off the profiteroles, and whipped up some pastry cream in the evening, then made caramel and constructed the croquembouche the next day.


It felt like a very fancy dessert, the techniques are classic but simple and I'll definitely be trying to perfect my technique by making this again soon!


I did find that the dough was way too runny, you can see my profiteroles just spreading on the baking sheet, I think my eggs must have been bigger than the ones used in the original recipe. I also think that milk is a nice addition instead of water, these were extremely eggy pastries! After reading some of the comments it seems I was not alone. I'll be using another recipe in the future.


The pastry cream came together nice and quick, my only change was omitting the sugar and adding a can of dulce de leche for a delicious spin on classic pastry cream.


The really tricky part was the assembly. I dipped each pastry into the molten caramel to construct and ended up with a few little burns on my finger. Any attempt to use tools resulted in a big mess. I think maybe constructing layer by layer would result in a safer construction, and also a little less caramel, these were difficult to eat with a thick layer of caramel on them!

Thanks so much for the challenge, I will definitely be revisiting this one!

If anyone has any advice for playing with spun sugar, I'd love to hear about it!